Tuesday, March 31, 2009

Tie-dye tutorial and a sketch

Hey stampers - Happy Tuesday morning to you!
I have to say that I'm just LOVING Amy's sketches lately.
Here's her sketch for this week...We just finalized our dates for our annual trip to Hawaii, so I was feeling a little tropical today!
Here's what I came up with... All of the paper is from a tropical themed Simply Scrappin kit that was retired by SU a couple of years ago. I just opened it for the first time today!

The Hawaiian shirt image is from an old SU set called "Do the Hula". Instead of stamping out the shirt in solid ink, I decided to do a tie-dye pattern.
Here's what the inside of the card looks like.
Want to try this tie-dye technique for yourself?
First, I matched up some re-inkers to my papers.
I ended up using Cameo Coral, More Mustard, Green Galore and Tempting Turquoise.

Next, take a clean baby wipe and put it on top of a plastic baggie or something else to protect your work surface. If you don't, you'll be sorry!
Then, just drop the ink randomly onto the baby wipe. Basically, you're creating your own ink pad.

Now, just ink up your image with your new custom ink pad and stamp away!

This was my result.
The cool think about this technique is that no two images will be identical. So simple, but such a great result.

Now I have a stamped image that matches perfectly to my papers!

Since I was working off of a sketch today, I also have a Christmas card to share with you.
This one uses an image by Rachelle Anne Miller called "Cuddling".

Hope my tutorial was helpful. If you try out the tie-dye technique, I'd love to see what you do with it!
I'll be back tomorrow...

Monday, March 30, 2009

Only for the twisted...

I'm sure most of you have seen last weeks sketch challenge over at Splitcoast.
It was such a unique layout that I wanted to give it a try. Here's what I came up with....
I used the main image from "Merry Christmas" and a sentiment from "Twisted", both by My Favorite Things. The center element is a 3 inch square, just in case you'd like to try out this sketch for yourself.
I used Baha Breeze for the base and paired it up with Close to Cocoa and some patterns from "Urban Garden" and "Candy Lane". To finish it off I added some sheer pink ribbon, a button and did some piercing with my pokey thing.

Since I was working off of a sketch today, I also have a Christmas card to share.
The images are from "Sleigh Full of Toys" by Stampin Up. I grabbed some More Mustard and Purely Pomegranate cardstock and was lucky enough to find a scrap of patterned paper that matched perfectly.

Since it's a Christmas card, I decided to fancy it up a bit and add some bling and iridescent ribbon.
Did you play along with this sketch also? I'd love to see what YOU did. Leave me a link so I can check it out!
Hugs,

Saturday, March 28, 2009

Saturday Sketch Time!

On the last Saturday of the month Lauren and her sketch team choose a sketch from the past and play with it again. Can you believe that it's already the last Saturday in March? I'm still trying to figure out where January went!

Here's the sketch that I decided to re-visit...Here's what I came up with...
Quick and simple!
I really like the color combo I used and may have to play with it again sometime soon. The flower images are from "Embrace Life" by SU. After I colored them with my Copics, I cut them out and adhered them with dimensionals. The background paper is from the retired Bali Breeze collection, which I totally stocked up on before it was gone for good.

I added a scalloped border and a rub-on sentiment to finish it off.


And as with EVERY sketch challenge that I do now, I also have a Christmas card to share with you today.

Here's my Christmas version using the same sketch...
Remember this little cutie from SU's "Polar Pals"? The patterned paper is from the Figgy Pudding collection by Basicgrey and matched perfectly to Baha Breeze cardstock.

I stamped out the scarf image from "Cold Play" onto Close to Cocoa cardstock and trimmed it to fit my chubby little penguin.

Thanks for stopping by!
Which sketch are you going to re-visit??

Be sure to check out what the rest of the sketch team gals did:
Dawn, Kim, Kirsten, Kristy, Maria, Kendra & Tamara

Oh, and if you're in the market for some stamps, check out what I've got listed for sale here.
Have a super weekend! I'll be back on Monday with something a little twisted for you.

Friday, March 27, 2009

DO try this one at home!

Monica had this posted on her blog and I just HAD to play along. I asked my kids the following questions about me and these were their answers. My 5 year old daughter's answers are in pink and my 7 year old sons answers are in blue. Try this with your kids if you get a chance - it's so worth it!

1. What is something mom always says to you?
a) I love you
b) I love you

2. What makes mom happy?
a) When me and my brother get along with each other
b) When I'm nice and helpful

3. What makes mom sad?
a) When we're mean
b) When I'm mean and unhelpful

4. How does your mom make you laugh?
a) When she tells me funny stories
b) When she tickles me

5. What was your mom like as a child?
a) She had a Strawberry Shortcake room
b) She was just like my sister

6. How old is your mom?
a) My best guess is 23
b) 31?

7. How tall is your mom?
a) 9 feet
b) 5 feet 4 inches

8. What is her favorite thing to do?
a) Read to us
b) Stamp

9. What does your mom do when you're not around?
a) Sometimes she teaches stamping classes
b) Stamp

10.If your mom becomes famous, what will it be for?
a) Flying on a trapeze
b) Stamping

11. What is your mom really good at?
a) Giving us hugs
b) Stamping

12. What is your mom not good at?
a) Starting the lawn mower
b) Being mean

13. What does your mom do for a job?
a) Takes care of us
b) Stamps

14. What is your mom's favorite food?
a) Salad
b) Tofu

15. What makes you proud of your mom?
a) When she gives us hugs and kisses
b) She takes good care of us

16. If your mom were a cartoon character, who would she be?
a) One of the Disney princesses
b) Bugs Bunny

17. What do you and your mom do together?
a) Read
b) Have fun

18. How are you and your mom the same?
a) We're both girls
b) We both have hair

9. How are you and your mom different?
a) I have brown hair and she has yellow hair
b) I'm a boy

20. How do you know your mom loves you?
a) She's always giving me hugs and kisses
b) Because she always takes care of us and tells us she loves us

.21. What does your mom like most about your dad?
a) He's nice
b) His beard

22. Where is your mom's favorite place to go?
a) Olive Garden
b) Starbucks

Go do this with YOUR kids now!

Fool Your Family Friday!

I can't believe it's Friday already. Are you ready to fool your family again?
Last weeks recipe was chocolate cake made with beets. Some of you weren't sure about that one, but the kiddos and I made it last weekend and it was DELISH!

Less than 48 hours later, it looked like this....

We made a few minor changes to the recipe because I was too lazy to go to the store and the kids wanted to bake the cake RIGHT NOW.

1 - Instead of buttermilk, we used vanilla soy milk.

2 - We didn't make the frosting. I thought I had cream cheese in the fridge...

3 - Instead of semi-sweet chocolate, I melted chocolate-raspberry morsels because that's what was in the pantry.

My daughter has requested it for her birthday party next month!


Okay, so are you ready for this weeks recipe?
SPAGHETTI & MEATBALLS

1/2 pound lean ground turkey
1 cup breadcrumbs
1/2 cup butternut squash puree
1 clove garlic, minced
1 teaspoon salt
1/4 plus 1/8 teaspoon black pepper
nonstick cooking spray
2 teaspoons olive oil
1 (26 oz can) whole peeled tomatoes with juice, pureed in blender
1/2 cup water
1/4 cup carrot puree (optional)
1/4 teaspoon garlic powder
pinch of cayenne pepper
1 bay leaf
1 pound spaghetti or angel hair pasta

1. In a large bowl, mix the turkey, breadcrumbs, butternut squash puree, garlic, 1/2 teaspoon salt and 1/4 teaspoon black pepper until well combined. Shape the mixture into 1-inch meatballs and place on a sheet of waxed paper or aluminum foil.

2. Coat a large nonstick skillet with cooking spray and set it over high heat. When the skillet is hot, add the olive oil and then the meatballs and brown for 4 to 5 minutes, turning occasionally.

3. Add the pureed tomatoes, water, carrot puree, garlic powder, cayenne, bay leaf and the remaining 1/2 teaspoon salt and 1/8 teaspoon black pepper. Reduce the heat to low and simmer for 15 to 20 minutes, or until the meatballs are no longer pink in the center. Remove the bay leaf.

4. Meanwhile, cook the pasta until al dente. Drain and place in a serving bowl. Spoon the meatballs and sauce on top and serve.

BonAppetit'!

I'll be back tomorrow with a Saturday Sketch challenge from Lauren.
See you then.

Thursday, March 26, 2009

Color Challenge - 2nd post today

Kristina just posted her color challenge for the week and I was able to sneak in a few minutes to play along. Here are this weeks colors....

I just got "Trendy Trees" in the mail a few days ago and thought this would be the perfect opportunity to break it in. I made this card to send to my Grandma, so I wanted to keep it pretty simple.

It's kind of hard to tell from the picture, but the background patterned paper is pale yellow with white polka dots. The reverse side of the polka dot paper is the brown pattern that I used for the bottom of the card. I'm pretty sure the papers are from the "Candy Lane" pack by SU.

The sentiment on top is from a retired set and the yellow ribbon is from the Sale-A-Bration catalog. I also used that ribbon on the card in my post from this morning.

Gotta run - we're off to Taekwondo tonight.
Thanks for stopping by!
Be sure to check in tomorrow for another sketch challenge with Lauren and the rest of the team.

Plain ol' ink and stamps....

Today I wanted to do a card that didn't require any coloring. We all have our "go - to" tool or embellishments when it comes to paper crafting. My two favorite items are my Copic sketch markers and my paper piercing tool. For this card, I decided to not use either, which really took me out of my comfort zone. To challenge myself even a little bit more, I decided to use a stamp that I haven't touched in ages.

Here's what I came up with... What do you think??
The main image is by Inkadinkado and it's one of the first stamps I ever purchased. My mother-in-law is a seamstress so I picked it up to make a Mother's Day card for her many years ago. I stamped it out in Chocolate Chip ink onto Very Vanilla cardstock and then sponged Creamy Caramel around the edges.

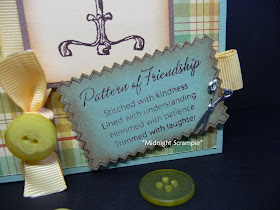
I made the 5 x 7 base of the card from Baha Breeze and thought this plaid patterned paper by Cosmo Cricket matched it nicely.
The yellow ribbon is from the SU Sale-A-Bration catalog. I've never been a fan of yellow in the past, but this lighter shade is starting to grow on me a bit. To finish off my card, I added some buttons and a sentiment from SU's "Pattern of Friendship" set. The mini scissors are a brad. Aren't' they cute?! I picked up a bag of them from a scrapbook expo a couple of years ago specifically to use with "Pattern of Friendship".

I was pretty happy with my result from stepping out of my comfort zone. I may have to try it again sometime soon. It sure is quicker to whip out a card when you don't have to color!
Thanks for poppin' by today.

Wednesday, March 25, 2009

Crackers for Animal Crackers

My sister-in-law just purchased this ADORABLE set from SU called "Animal Crackers". Lucky me - I got to ink it up before her!
Today I borrowed her new set and just stamped for fun.
Here's what I came up with...

Everything was from my scrap bin and the images were colored with my Copics. After I assembled my card, I noticed a little smear on one of my image panels. I decided to use the new heart punch and covered it up.
Remember? No mistakes - just embellishment opportunities!

Actually I think it looks better with the hearts.
Here's what the inside looks like.


Hope you like my card.
I think I may have to use this set for my next class!
Thanks for stopping by.

Tuesday, March 24, 2009

Teacher Appreciation

Teacher appreciation week is coming up soon at our school and I wanted to make a special card for my daughter's teacher. Anyone who spends her days with 20 five year olds is pretty special in my book!


I'm sure I'll make some other goodies for her, but here's what I've got so far...This card is 6 x 6 and uses the "Teacher Anya" image from The Greeting Farm.
When I was trying to figure out what I wanted to do for the layout, the first thing that came to mind was a chalkboard. I don't even think they have chalkboards at school anymore. Everything is so high-tech now, but I thought it was cute and decided to go with it.

The base is Rose Red and the alphabet patterned paper is by Carolee's Creations. The actual chalkboard is just a scrap of green cardstock and then I sponged the edges with my white craft ink. I stamped some thank you sentiments in white ink and left room for my daughter to write her teachers name with a white marker.
So what do you think of my chalk? Any guesses on what it is??


I took a q-tip and cut it with scissors!
Even my husband was impressed - and that is no small feat!
Well I guess that's it for me today!
I'll be back tomorrow....

Monday, March 23, 2009

Owls and Ribbon and Flowers, oh my....

Hey everyone -
Hope you all had a nice relaxing weekend. Yesterday I had a chance to sneak up into my workshop and play with Amy's new sketch. I didn't have the sketch with me when I did it, so I had to play on memory!
Here's what I came up with...
Pretty darn close to the sketch right? I really like how this one came out!
The branches and owl image are from a Sassafrass Lass set called "Oliver & Friends". The sentiment that matches perfectly is courtesy of Hambo and the tiny paper roses are by All Natural Accents.

For the base of this card, I used Close to Cocoa and then matched some patterned papers from the "Candy Lane" collection by Stampin Up. I used some yummy thick Baha Breeze ribbon along with pink grosgrain ribbon for the vertical elements on the sketch.

The sentiment was stamped out in Baha Breeze onto "Candy Lane" patterned paper and then cut to fit.


Here's a Christmas card that I did for my collection with the same sketch...
For this one, I used an uber-cute image by Rachelle Anne Miller called "Skating". I picked it up to use on my daughters birthday party thank you cards next month, because she was going to have her 6th birthday at the skating rink. She's been talking about if for almost a year - no joke! As soon as I got my cute new stamp in the mail and got ready to book the skating rink, she changed her mind!

This poor little stamp was sitting on my table just waiting to be inked up, so I decided to make a Christmas card.
I colored with my Copics and then added Stickles to the ice.

Thanks for poppin' by today!
Be sure to check out my post from yesterday if you're interested in helping me thin out my stamp collection.
Hugs,