Followers

Showing posts with label My Timeless Templates. Show all posts

Saturday, September 26, 2009

My Timeless Templates

My cabana boy has the day off because I'm home!

Hey kids!
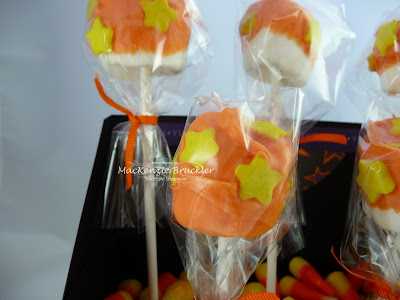
It's Saturday already and that means a new challenge from Lauren and the "My Time to Create" team. This challenge is a GREAT one! Use a My Timeless Template, designed by Lauren herself, and create a package for candy!Here's what I came up with using "From the Desk of"... To make the pops stand up on their own, I used a scrap of thick black cardstock and created an insert. I cut the cardstock to 6 x 5 1/2 inches and scored on the long side at 2" and 4".
Then I folded on the score lines and used my Crop-A-Dile to punch 5 holes for the sticks.


Then I added the pops and filled the bottom with candy corn.
These pops are super easy to make.
Apparently they're delicious too, because they've all disappeared from my workshop!

All you need are lollipop sticks, orange candy melts, large marshmallows and sprinkles. Melt the orange candy melts in the microwave according to the package directions. Push the marshmallows down onto the lollipop sticks and then dip into the candy melts. Before they harden, cover with sprinkles and then place in the refrigerator for about 10 minutes to set.
I hope you're inspired to play along with us! Be sure to check out what the rest of the design team did and upload your creation by going to Lauren's blog.

Thanks for stopping by! I'll be back on Monday and with a new challenge from the CSAYL blog to share with you.
Until then...
Saturday, August 22, 2009

My Timeless Templates

The Bruckler family survived the first week of school! My kids have AMAZING teachers this year and I can't wait to spoil them rotten!

Since were all in "Back to School Mode", Lauren and the rest of the DT have the perfect challenge for you...

Choose a My Timeless Template (designed by the uber-fabulous Lauren herself) to play with and make a Back to School themed project.

While I was up in my workshop contemplating what to make, my daughter looked up at me with her big beautiful brown eyes and asked if I'd make something special for her and her brother. Seriously, how could I say no? Besides, I've got the whole rest of the school year to spoil the teachers :-)

Here's what I came up with using Filled with Flair...

We have a homework station set up in our kitchen where the kids can keep all of their school assignments, supplies and endless paperwork organized. I printed up three Filled with Flair templates on Real Red and Wild Wasabi cardstock and attached them together creating sections for some of their homework supplies. All three templates fit into the cute tray, which is INCLUDED in the $5 template price. What a steal!I used my SU punches and computer generated text to create labels for each section.

Then I wrapped the tray with this adorable alphabet ribbon that I stock up on everytime I'm able to find it.
As you can see, I stamped a Hambo apple image to the sides of the template and clear embossed to add a little interest. I also added a 1/2" to the tray template so I could fit some erasers on the side.

My kids absolutely LOVE this and it totally made my day to give it to them.
I can't wait to see what YOU do with the challenge!

Be sure to stop by my sidebar and check out what the rest of the design team came up with.
--------------------------------------------------->
(Blogger won't let me copy and paste links to my posts anymore - any ideas or tips?)

Thanks SO much for stopping by today!
Enjoy the rest of your weekend,

Saturday, July 25, 2009

"My Time" to create...

I'll be doing all of my blogging from bed for the next week. I've got a kidney infection and kidney stones......again. The next few posts I make will be short and sweet - before the meds kick in and knock me out!

Today Lauren has issued a template challenge using the following photo as inspiration.I decided to use the "Filled with Flair" template and this is what I came up with.
My friend has a birthday coming up, so I made the template and filled it with six matching monogrammed cards.
I believe the patterned paper is from SU's collection called "Urban Garden". The monogram letter is from a Martha Stewart monogram stamp set. I picked it up ages ago in hopes of making monogrammed card sets as gifts, but this is the first time it's finally seen some action.

Here are some detail shots of the cards.
I made two each of three different patterns and tried to keep them clean and simple.


Here they are all together.
Hope you're inspired to play along with us!
You can check out all of Lauren's fab templates here.

Be sure to check out what the rest of the DT gals did by going to my sidebar.
As for me, I'm of to la-la land....

Saturday, June 20, 2009

MTTC03 - "My Timeless Template" Challenge

Happy Saturday! You know what Saturday means right?!
A new challenge from Lauren!

Todays challenge is:
CREATE YOUR OWN PATTERNED PAPER AND USE IT ON ONE OF My Timeless Templates.

I hope you're inspired to play along with us!

For my project I used the "Recipe Wrap Up" template. This template is a FREE sample on the PTI website, so there's no excuse to not play along!

As I'm sure most of you have heard by now, our fellow "My Time" design team member Alicia, lost her four year old son, Ethan, to cancer last week. I decided to make a mini memory album for Alicia and her family. Ethan was a true cowboy at heart and I thought it only fitting to use my "Cowboy Billy" image by Pink Cat Studio.

Here's what the front cover looks like...I cut out some large stars on my Cricut machine, did some paper piecing on Billy and layered them together. Then I added some twine for his rope and did some piercing with my pokey tool around the smaller star.

Here's how I made my own patterned paper...


I started with Kraft cardstock, a More Mustard marker and the "Your Super" image by Pink Cat Studio. I used the marker to just color the stars around the text on the stamp. Then I randomly stamped the stars onto the cardstock.


Next, I added some text...


I used Really Rust ink and the "Howdy Partner" text from the same set. Then I stamped it in the middle of the stars. (I made six of these panels for the outside of the album)

Then I sponged the edges...


I use Creamy Caramel for almost all of my sponged edges.

Sponging is a simple technique that adds great depth and definition to any project. I did a little comparison in the photo below. The panel on the left is NOT sponged along the edges and the panel on the right IS sponged.


It's subtle, but makes a huge difference.

For the two smaller panels on the album, I used the same technique...


I stamped the stars from SU's "Just Jawing" onto Kraft cardstock with More Mustard ink. Then I sponged the edges with Creamy Caramel.


I adhered some Chocolate Chip ribbon to the front cover and then added my panels on top. The ribbon will be used to tie it shut.


Only the front, back and spine are shown here. There are six panels total.

Now, it's time to work on the inside...


For the six panels on the inside, I used Very Vanilla cardstock, More Mustard & Creamy Caramel inks, and the stars from "Just Jawing".

Then I adhered them all to the inside...


After that step, I added some photos of little Ethan and layered them onto Close to Cocoa and More Mustard cardstock.

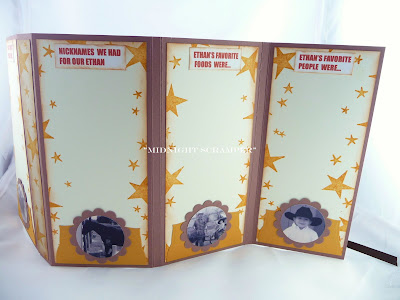
Here's what the inside looks like...


Each panel has a small place to write down memories of Ethan.

This is the right side...


Nicknames we had for our Ethan...
Ethan's favorite foods were...
Ethan's favorite people were...

Here's the left side...
Ethan's favorite places to visit were...
Ethan's favorite thing to do was...
Ethan's favorite phrases were...


And here's another peek at the front cover.


Alicia always said that this image reminded her so much of her little Ethan.


You can read Alicia's most recent journal entry here.

Be sure to check out what the rest of the team came up with for our challenge:

Lauren Meader
Maria Levine
Tamara Harder
Jen Tapler
Dana
Kristin
Lisa Kind
Odette
Pam
Tracey Cuccia

Thanks for stopping by.
Enjoy your weekend and hug your little ones a little tighter tonight.

Saturday, May 16, 2009

My Timeless Templates

Yahoo - the weekend is finally here!
Today also brings a NEW challenge from Lauren.
As I'm sure most of you know, Lauren is the creator of the fabulous line of "My Timeless Templates" that are available exclusively at Papertrey Ink. Each month we'll do a template challenge and we hope you'll all play along with us.

Here is our challenge for today using one of Lauren's templates...

My six year old daughter celebrated her birthday last month at Disneyland. She had a special birthday dinner with all of the princesses where she had the opportunity to spend some one on one time with each of them.

I decided to surprise her with a very special princess autograph book that I created with the "Recipe Wrap Up" template.
Here's what the front looks likes...

I added a 1/2 inch cube to the top to hold a pen... And here's the inside!
I made the princess silhouettes with my Disney Cricut cartridges and added a piece of Whisper White to the top section for the autographs. The base is made out of Pale Plum cardstock and accented with some pink and white patterned paper from Stampin Up.

I hope you like it!
The princesses were all very impressed, if I do say so myself.

Here are some sneak peeks at what the rest of the team did... Be sure to check them out here:

Lauren Meader
Dawn Easton
Alicia Weiman
Maria Levine
Tamara Harder
Jen Tapler
Dana
Kristin
Lisa Kind
Odette
Pam
Tracey Cuccia

AND be sure to check out Lauren's new templates that were released yesterday!
So cute, they'll make ya sick!

Have a super weekend!
See ya Monday,