Followers

Showing posts with label Inky Impressions. Show all posts

Wednesday, November 30, 2011

Peppermint Twist

Happy Wednesday crafty people!
Today is challenge day over at the Inky Impressions Challenge Blog and this will be my last project as an Inky team member.  The challenge today is called "Peppermint Twist" and we want to see how you interpret it onto your holiday card or project. 
Got any red and white striped twine? 
Cute candy embellishments?
How about a fun candy cane image?
I decided to use some cute candy themed patterned paper and make a 4" x 4" gift card holder.
Here's a peek at the inside...
The best part about this project is that it's QUICK and EASY. 
(My two favorite words when it comes to crafting) 
You can get three of these babies out of one 12" square of cardstock!

Here's how to make one...
Cut cardstock to 4" x 12" and score at 4" and 8".
This will leave you with three 4" sections.

Next, score the middle section diagonally, starting from the top left corner and ending at the bottom right corner.

Fold on the middle score line and this is what you'll have.

Next, fold over the right section as shown and adhere.

Then fold up the bottom square behind the diagonal fold.

Ta-Da!
Now you have a pocket. 
Adhere where needed, being sure to leave room in the pocket for your gift card.  Then embellish your little heart out and make someones day!

Wednesday, November 2, 2011

Inky Challenge

In addition to day 2 of  the Inky Impressions blog hop, today is also challenge day!  This week we worked with an inspiration photo of fall leaves and this is what I came up with...
I used some fall papers by Imaginisce a sentiment by Inky Impressions.
I finished it off with some tiny leaves and a couple of Inky Dinky Drops.
Hop on over to the challenge blog for all the details and to play along with us.

Inky Impressions Snow Much Fun Blog Hop - Day 2

Hello again Inky fans!  If you came here from Michelle's blog, then you're right on track.  If not, and you'd like to play along for your chance to win a $25 gift certificate to Inky Impressions, you can start right here.
It's day two of the blog hop and and this sweet new digital image is called "Marisa's Sleigh Ride".
I decided it was time to thin out the ol' scrap bin, so I used some patterned scraps and made a holiday gift tag.  I never seem to have enough during the crazy holiday season.
Marisa is absolutely adorable, no?
Your next stop on the hop is......Lora!

Here's the link list, just in case...

Not enough Inky for ya?
Hop on over to the Challenge Blog and check out the new challenge and all the juicy details. 

Tuesday, November 1, 2011

Inky Impressions Snow Much Fun Blog Hop - Day 1

Welcome to the Inky Impressions blog hop!  We're very excited to show you some fabulous new designs for Winter.  I hope you're having fun hopping around the DT's blogs and getting inspiration. 


If you've come here from Lora's blog, then you are in the right place.  If you're just starting out and you'd like to play along for your chance to win a $25 Inky gift certificate, pop on over to the beginning of the hop for all the juicy details.

For my card today, I used a new digital image called "MaMaw Skiing".
I used "frosted lace" Stickles and glitter for the snow.
Then I finished it off with a sentiment and a fun little winter charm.
*Sentiment reads - "If a snowflake fell every time I thought of you...We'd really have a white Christmas"

Your next stop on the hop is.....Michelle!

Here's a complete list of the hop participants:
MacKenzie (you are here)

Don't forget to come back tomorrow for DAY 2!

Wednesday, October 19, 2011

It's Pumpkin Time

It's Inky Challenge time again and this week we're going Trick-Or-Treating. We want you to make a Halloween card and utilize the colors orange and black. Here's what I came up with using the "Lili's Pumpkin" image.


I stamped the sentiment in white ink, punched it with an small oval and added a silver pumpkin charm. I glued some orange cardstock to the back of the charm so the jack-o-lantern details would *pop*.


The layout was inspired by this sketch and the patterns that I picked were inspired by the "Spooky Hues" challenge at Papertake Weekly. To ground the main image, I drew in some fall colored grass and sponged on some clouds in the background.


I finished it all off with some clear Inky Dinky Drops.


Hop on over to the Inky Challenge Blog to play along with us and get all of the juicy details!


Wednesday, October 12, 2011

Inky Inspiration

Today I have a quick and easy project to share with you. Quick and easy projects are the best!  And they definitely come in handy when I need to make goodies for my kiddos and their 54 classmates.

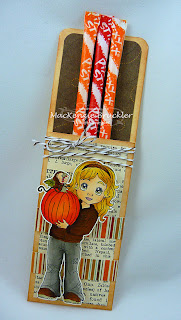
Here's a Halloween / Fall inspired candy holder.
I used some patterned paper scraps with Fall colors and then added Lili to the front.  Then I wrapped some striped twine around a few times to finish it off.
There are so many great challenges this week will Fall inspiration.  You should definitely check them out and play along!
The Crafters Cafe - "brown, yellow, orange"
Cupcake Craft - "Halloween"
Creative Stamp Friends - "Autumn Colors"
Hooked on Crafts - "anything but a card"
The Pink Elephant - photo inspiration
The Ribbon Reel - photo inspiration
Bows and Berries - photo inspiration


If you use the following dimensions, you'll be able to get 4 of these babies out of one sheet of 8 1/2" 11" cardstock!
Cut a strip of cardstock to 2" x 10 1/4".
Score at 4" and fold.
Easy-Peasy!

If you wanted to put in something larger, like a candy bar, just increase the 2" width.
Be sure to hop on over to the Inky Impressions store and check out all of the cute images and great embellishments available.  You can also check out the Inky Inspiration and Inky Challenge blogs for all sorts of eye candy!  Thanks for visiting today.
Hugs

Wednesday, October 5, 2011

Ready to get Inky....and pinky?

Hi Inky fans!
It's time for another challenge over at the Inky Challenge Blog.
  This time we want you to show your support and we want you to do it with PINK.  Our challenge is themed around breast cancer awareness and a monochromatic color scheme.  You can use a boy image and deck him all out in hues of bubble gum, or if you have the Lili's Awareness Ribbon image, you can use her.

Here's what I came up with using sweet Lili and Karen's Sunday Sketch...
Did you know that a portion of the proceeds from the sale of this image are donated to the National Breast Cancer Foundation and the American Diabetes Association? Love that.
I used a very pink pattern by Bo Bunny and paired it with some pink glitter cardstock.  Then I paper pieced her outfit and surrounded her with Inky Dinky Drops and clear jewels. 
We'd love for you to show your support and play along with us. 
Hop on over to the Inky Challenge Blog for some dt inspiration all of the juicy details!

And if you're feeling really inspired, here are more cancer awareness challenges going on this week.
Happy Stampin'!

Wednesday, September 28, 2011

Ribbon Awareness Girl

My friend just had surgery for colon cancer and I wanted to pop a card in the mail for her.  Just a little something to let her know that she was in my thoughts.
This image by Inky Impressions was absolutely perfect. It's called "Lili's Awareness Ribbon" and you can find her right here.  A portion of the proceeds go to the American Breast Cancer Association and the American Diabetes Association - very cool. 
I used a sketch from Create with Connie and Mary for my layout and embellished with some blue rhinestone brads from Inky Impressions.  I paper pieced her overalls with a fun striped pattern for the challenge over at Splitcoast, and drew in some concrete and grass to ground the image. 
I colored the ribbon light blue, because that's the "color" for colon cancer awareness.  I found a great website that lists all of the different ribbon colors and meanings.

Here's a peek at the inside. 
I just used scraps left over from the front of my card and stamped the same image in a pale blue color.


I put together a quick photo tutorial on how I drew in my concrete.  Hopefully you'll find it helpful and give it a try.
First, I took a Copic multiliner with a very fine tip and drew in a solid line.
This will be the "top" of the concrete.

These are the three colors I always use for this technique.

Next, I took my darkest color (C7) and drew in a small shadow under her feet.

Then I filled in with my medium color (C5).

Then, I took my lightest color (C3) and filled in the rest using small circular strokes.

I also decided to draw in some grass and flowers. 
If you'd like to see my tutorial for that, click here.

Hope that all made sense!  If you give it a try, share a link to your project - I'd love to see it!
Thanks for poppin' by today.  And don't forget, you can always check out the Inky Impressions blog for daily inspiration.