Followers

Tuesday, June 30, 2009

Can't wait for June to be over...

How many sympathy cards will I have to make this month?
First Alicia lost her son.....to cancer.
Then my friend Barbara lost her sister on the same day.....to cancer.
My close friend & neighbor lost her Uncle last weekend....to cancer.
My OTHER neighbor lost her husband on Monday....to cancer.
My good friends wife was just diagnosed...with cancer.

What a sad month it was. July can only get better right?

Here's a card I made for my very close friend who just lost her Uncle to lung cancer.
Hopefully the last sympathy card I'll have to make this month... For this one, I used images from SU's Fifth Avenue Floral set. I decided to watercolor the images with a Riding Hood Red ink pad and an aqua painter. I layered the main panel with dimensionals onto two strips of patterned paper from the Riding Hood Red designer series pack.
The ribbon is from American Crafts, which matched perfectly with the SU color I used. The bow needed a little something, so I finally used a Kiwi Kiss corduroy button that I've been hoarding since they first retired.

To finish it off, I used some Doodlebug Sugar Coating on the yellow part of the flowers to add a little sparkle.

Here's hoping for a wonderful July!
Go hug the people you love,

Monday, June 29, 2009

Cleaning out the ol' workshop!

Hey everyone,
I just updated my "Stamps For Sale" page. If you see anything you're interested in, just send me an e-mail with your zip code so I can figure out actual shipping costs.
Thanks,

Christmas Stampin' All Year Long

Monday morning brings a new challenge from the Christmas Stampin' All Year Long blog! This week our challenge was to make a white Christmas card. I like to use lots of color, so this challenge was a great way for me to step outside my comfort zone and try something new. After all, that's the point of a challenge right?!

Here's what I came up with... I used this sketch by Maria for my layout...
These little ice skating cuties are by Rachelle Anne Miller. I colored them in with some neutral colored Copic markers and then added Stickles to the ice skating rink for some sparkle.
To finish it off I added some white organdy ribbon and a sentiment, both by Stampin Up. I used Sahara Sand ink for the sentiment and then punched it with my scallop circle.

You can check out what the rest of the talented gals from the design team did by clicking here.

There were lots of cute entries for our "freebie" challenge last week, but this card by Lisa caught my eye. Thanks to all of you who play along with us each week! I really love to see what you all do!

Now get stampin...

Saturday, June 27, 2009

"My Time" to color...

Finally Saturday! And you know what that means....a new challenge from Lauren!He had a double challenge this week.
Create a card using the Pink Cat Studio images below with the color palette above.

These digital images have raised over $1,380 since Monday for the Make-A-Wish Foundation!!
THANK YOU! THANK YOU! THANK YOU!
The stamping community never ceases to amaze me!

Here's my card for today's challenge...
I colored in little Cowboy Ethan with my Copic markers and made a little badge for the left side. This is a gate fold card, so the little badge is actually holding down the main image and keeping the card shut.

To make the badge, I just re sized the digital sentiment to fit inside my 1" circle punch. Then I colored the horseshoe with a gold pen, sponged around the edges and layered it on top of a star that I cut out with my Cricut.

My fellow "My Time" DT member, Tracey, has a great tutorial on using digital images.
You can view it by clicking here.

You can also see two other projects I made with this set by clicking here.
Thanks for stopping by today.
Be sure to check out what the rest of the DT did:
(my copy and paste function isn't working lately, but you can find all their links on my sidebar)


Friday, June 26, 2009

Welcome to Fool Your Family Friday!

Ready to fool those picky kids of yours?
If you're new to Fool Your Family Friday - click here.

MASHED POTATOES

1 pound baking potatoes, peeled and cubed
1 teaspoon salt
1/2 cup cauliflower puree
2 tablespoons butter
1/2 cup low fat buttermilk

1. Put the potatoes and salt in a large pot and add enough water to cover the potatoes by about 3 inches. Bring to a boil over high heat, then reduce the heat and simmer until the potatoes are tender when pierced with a fork, 15-20 minutes. (Or steam them for about 30 minutes). Drain well in a colander.

2. Set a potato ricer over the pot and pass the potatoes through in batches. (Or return potatoes to the pot and mash with a potato masher.) Add the cauliflower puree, butter and buttermilk and beat with a large spoon until the potatoes are smooth and creamy.

I'll be back tomorrow with a color challenge from Lauren.

Thursday, June 25, 2009

She said "no", but I'm gonna post it anyway...

Okay....so there's definitely a story that goes with this card!
About a month ago, my 29 year old cousin from New Jersey called me to tell me how much he loved my cards, and to ask me a special favor. He realized that he let the girl of his dreams go and move back to Oklahoma. He was totally in love and wanted her to come back for a visit so he could "woo" her back into his arms.

Here's where the special favor comes in. He asked me to make a card for her, inviting her to come out for a week long visit to New Jersey - airplane ticket included!


Here's where it got a little complicated....
He said that he wanted ALL of these themes incorporated into the card:
Princess - because she should be treated like one
Sight Seeing - because he planned on taking her to local tourist spots
NYC Skyline - because he planed on taking her to a Broadway show
Beach - because he was also planning an afternoon picnic at the Jersey shore

Oh yeah....and I only had three days to design it, make it and send it to him in NJ.

Pretty tall order, but I was up for the challenge!
Here's what I came up with for the cover...

I used my Princess Anya image and some text generated on my computer. I stamped her out twice so I could pop up her hair on dimensionals. Her crown and wand have Lily White Doodlebug Sugar Coating for some extra sparkle.

Since he had so many themes going on, I decided my best bet was a 6 x 6 gate fold card.
Here's the inside... These images are all from My Favorite Things.
The girl with the map and the skyline are from "Going Places" and the seagulls are from "By The Seashore".

So what do you think?
I was really happy with how it came out.
She said no, but I decided to post it anyways.
Ahhhh....love....so complicated.

Speaking of love.
The hubs and I are celebrating our anniversary today.
14 years together - 9 years of wedded bliss :-)

Wednesday, June 24, 2009

Hambo Hump Day

Today I wanted to share some Hambo goodies I made over the weekend. I just love this little mouse. For this card, I used So Saffron for the base and sponged the edges with More Mustard. Then I cut three panels of Pumpkin Pie cardstock, punched it with my 3/4" circle and sponged with Pumpkin Pie ink. I added the panels on with dimensionals to give it a little *pop*.

After I stamped out the main image, I colored it in with my Copics and cut it out with my Nestabilities. While the die was still on the paper, I sponged with Soft Sky ink. When I removed the die, there was a nice thick white border.

And no Hambo critter would be complete without a velvet flocked belly!
I did that with a Sakura glue pen and some Lily White Doodlebug velvet flock.


For this one, I used one of the many pig images from Hambo.
I went with a three panel layout on this one as well. I used the eyelet border punch on the bottom edge and embellished with a little wood heart from Michaels.
Be sure to hop on over to Hambo and see what they've got. Plus, they have a whole line of digital images now too! Ahhh...instant gratification. Gotta love that!

Tuesday, June 23, 2009

Totally Bitchin' Anya

Today I decided to ink up my Rock Star Anya image from The Greeting Farm.I kept this one very simple, which is easier said than done for me.
I used a black base and patterns from SU's retired Bali Breeze paper pack.
The "Totally Bitchin'" sentiment is from the Twisted Sentiment line over at My Favorite Things - perfectly fitting don't you think?
I colored Anya with my Copics and added some Doodlebug Sugar Coating to her headband and dress. Every rock star needs a little sparkle right?

Quick post for me today.
We're off to swim lessons.
Check back tomorrow for some Hambo creations!

Monday, June 22, 2009

Knock Knock - Who's There? - It's the "WEIMAN WRANGLERS"!!

If you're here for my CSAYL Monday challenge, please scroll down to the next post, but not before you read my exciting announcement!


Today I'm thrilled to announce the newest set of digital images now available from Pink Cat Studio!! This set is the result of collaboration between the uber-talented Melissa and Lauren in memory of our friend Alicia's four year old son, Ethan.

100% of the proceeds of these images will go directly to the "Make A Wish Foundation" in honor of Ethan Weiman. Pretty amazing don't you think?!
Here are the images...
Cowboy Ethan digital image and sentiments - $4
Cowgirl Ava digital image and sentiments - $4

Cowboy Ethan AND Cowgirl Ava with sentiments - $6

I was tickled when Lauren and Melissa sent me the images over the weekend and asked me to make some samples for the release today. Thanks gals for letting me be a part of this.


I decided to make a cowgirl gift set...Just adorable don't you think?

For the card, I used some patterned papers by BasicGrey and Stampin Up. The image was colored with my Copics and I embellished with some pink ribbon, a button and some twine.

And here's the cowboy boot gift box...
I used Lauren's Stocking Stuffer template for this. After I printed out the template, I added a pointy toe, a boot heel and a decorative top. I was totally amazed with myself when I finished and it actually looked like a cowboy boot! We've all been there right? You have a great idea in your head, but getting it out on paper doesn't always work. Mission accomplished this time!

After I had the boot shape cut out, I pierced around the edges.

Then I added some hand stitching to finish it off.

Here's what the boot looks like with a bag of goodies inside...

I decided to fill it up with "Trail" mix of course!

So are you ready to purchase some adorable images for a good cause?
CLICK HERE!

Need more inspiration?
Check out some more samples in the links below:

Melissa - Pink Cat Studio
Lauren Meader
Tracey
Maria
Dawn
Jen
Dana
Tamara
Kristen
Kendra
Lisa

Odette

Have a super Monday!
Big hugs to all of you...

Christmas Stampin' All Year Long

It's Monday and that means it's challenge time over at the CSAYL blog!
Today's challenge was to create a card using anything we wanted. That's right kids - no rules this week! The fabulous Maria Bell provided a sketch for those of use who wanted to use one, but it's not mandatory. I'm a total sucker for Maria's sketches, so here's what I came up with...
The images are all from My Favorite Things.

I added some Doodlebug Sugar Coating to the appletinis for a little sparkle.

Be sure to hop on over the the CSAYL blog and see what the rest of the divas came up with. You can also leave a link to YOUR project on the challenge post so we can see what you did with it.


Now go get inky!

Sunday, June 21, 2009

What fun is Father's Day if you can't torment the man you love??

Soooo.......the kids wanted to make something that Daddy could wear ALL DAY today.
We decided to make him a special badge... The cute image and sentiment are by Hambo.
This baby is going to get pinned on Daddy's shirt the moment he wakes up!
{insert evil grin here}
Have a great day.
I'll be back tomorrow :-)

Saturday, June 20, 2009

MTTC03 - "My Timeless Template" Challenge

Happy Saturday! You know what Saturday means right?!
A new challenge from Lauren!

Todays challenge is:
CREATE YOUR OWN PATTERNED PAPER AND USE IT ON ONE OF My Timeless Templates.

I hope you're inspired to play along with us!

For my project I used the "Recipe Wrap Up" template. This template is a FREE sample on the PTI website, so there's no excuse to not play along!

As I'm sure most of you have heard by now, our fellow "My Time" design team member Alicia, lost her four year old son, Ethan, to cancer last week. I decided to make a mini memory album for Alicia and her family. Ethan was a true cowboy at heart and I thought it only fitting to use my "Cowboy Billy" image by Pink Cat Studio.

Here's what the front cover looks like...I cut out some large stars on my Cricut machine, did some paper piecing on Billy and layered them together. Then I added some twine for his rope and did some piercing with my pokey tool around the smaller star.

Here's how I made my own patterned paper...


I started with Kraft cardstock, a More Mustard marker and the "Your Super" image by Pink Cat Studio. I used the marker to just color the stars around the text on the stamp. Then I randomly stamped the stars onto the cardstock.


Next, I added some text...


I used Really Rust ink and the "Howdy Partner" text from the same set. Then I stamped it in the middle of the stars. (I made six of these panels for the outside of the album)

Then I sponged the edges...


I use Creamy Caramel for almost all of my sponged edges.

Sponging is a simple technique that adds great depth and definition to any project. I did a little comparison in the photo below. The panel on the left is NOT sponged along the edges and the panel on the right IS sponged.


It's subtle, but makes a huge difference.

For the two smaller panels on the album, I used the same technique...


I stamped the stars from SU's "Just Jawing" onto Kraft cardstock with More Mustard ink. Then I sponged the edges with Creamy Caramel.


I adhered some Chocolate Chip ribbon to the front cover and then added my panels on top. The ribbon will be used to tie it shut.


Only the front, back and spine are shown here. There are six panels total.

Now, it's time to work on the inside...


For the six panels on the inside, I used Very Vanilla cardstock, More Mustard & Creamy Caramel inks, and the stars from "Just Jawing".

Then I adhered them all to the inside...


After that step, I added some photos of little Ethan and layered them onto Close to Cocoa and More Mustard cardstock.

Here's what the inside looks like...


Each panel has a small place to write down memories of Ethan.

This is the right side...


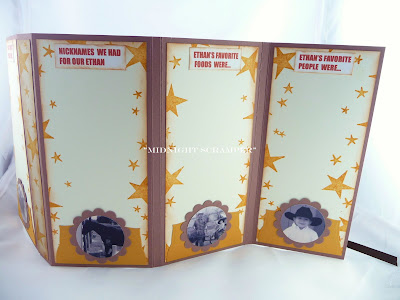
Nicknames we had for our Ethan...
Ethan's favorite foods were...
Ethan's favorite people were...

Here's the left side...
Ethan's favorite places to visit were...
Ethan's favorite thing to do was...
Ethan's favorite phrases were...


And here's another peek at the front cover.


Alicia always said that this image reminded her so much of her little Ethan.


You can read Alicia's most recent journal entry here.

Be sure to check out what the rest of the team came up with for our challenge:

Lauren Meader
Maria Levine
Tamara Harder
Jen Tapler
Dana
Kristin
Lisa Kind
Odette
Pam
Tracey Cuccia

Thanks for stopping by.
Enjoy your weekend and hug your little ones a little tighter tonight.