Followers

Tuesday, August 31, 2010

Feeling Fall

Is anyone else excited that Fall is just around the corner? Definitely my favorite time of year. Over the weekend, I put together a few Fall cards and wanted to share one with you today.The patterned paper by DCWV inspired the color scheme and layout. The sentiment is by Hambo and I paper pieced the letters for "Fall" to pull it all together. Then I put it all on a 4 x 8 kraft base and embellished with some tiny leaves. Quick post for me today - thanks a bunch for stopping by!

Friday, August 27, 2010

Christmas Stampin' All Year Long?

We're changing things up a bit over at CSAYL this week! The challenge is to NOT make a Christmas card - say what?!

Our fabulous sponsor this week is Soft Pencil and there's a $10 gift certificate up for grabs!
Here's what I came up with using an fun non-Christmas image called "Frog House". I used some polka dot patterns from SU's retired Bella Rose paper pack and paired it up with some Riding Hood Red cardstock.

I used a rub on sentiment along the bottom and finished it off with a fun chipboard flower and green jewel in the middle. (note to self - use more chipboard goodies)
If you'd like to play along with us this week, head on over to the CSAYL blog to see the rest of the teams creations, and to leave a link to your little beauty.


Thursday, August 26, 2010

Pink Cat Digital Release Day!

Are you ready for a fantastic new release from Pink Cat Studio?! First up today is Dr Billy...
Have you ever had a sick little one who's stuck in bed all day? I decided to make a card with an activity included to pass the time. The card opens up to a mini doodle kit!
I attached a piece of acetate to white cardstock using eyelets.
Then I added a rub-on sentiment and included a dry erase marker.
(my son couldn't wait to try it out - hence the race car)
On the left side, I added a little pocket with a tissue to wipe the acetate clean.

And here's Lily!
Isn't she the cutest in her nurse outfit?
I popped up her hat for a little dimension.

And finally, here's Itty Bitty Nurse Betty.
Adorable, no?
Be sure to hop on over to the PCS blog where you can see what the rest of the team came up with this week. And don't forget that Melissa is offering a free digi image with ANY purchase today only! Click here if you're ready to shop!

Monday, August 23, 2010

Wednesday on a Monday

I got a big fat package from the Greeting Farm over the weekend! I ordered lots of cuties, but my favorite by far is Wednesday. I inked her up right away and came up with this...I used Mojo's sketch from last week and was also able to incorporate a few other challenges into this card.
Two Peas - make a thank you card
Color Me Copic - grass technique
Wild Flower Patch - polka dots (I used tiny pink polka dots to make my flowers and there's polka dots on the patterned paper behind the main image)

Oh my gosh....she's the cutest!
And check out this super creepy skull embellishment.
My creepy friend Gloria makes these out of polymer clay! She had dozens of them in her workshop and I claimed a handful as my own.
That's it for me today. Thanks bunches for stopping by!

Friday, August 20, 2010

Christmas Stampin' All Year Long

TGIF!
I'm a guest contributor today over on Color Me Copic! If you missed my concrete tutorial earlier this week, hop on over to CMC and check it out.


It's challenge day again over on CSAYL.
This week, your mission, should you chose to accept it is to.....
Use two or more different ribbons on your card.

Our fabulous sponsor this week is Pink Cat Studio!

Here's what I came up with... 
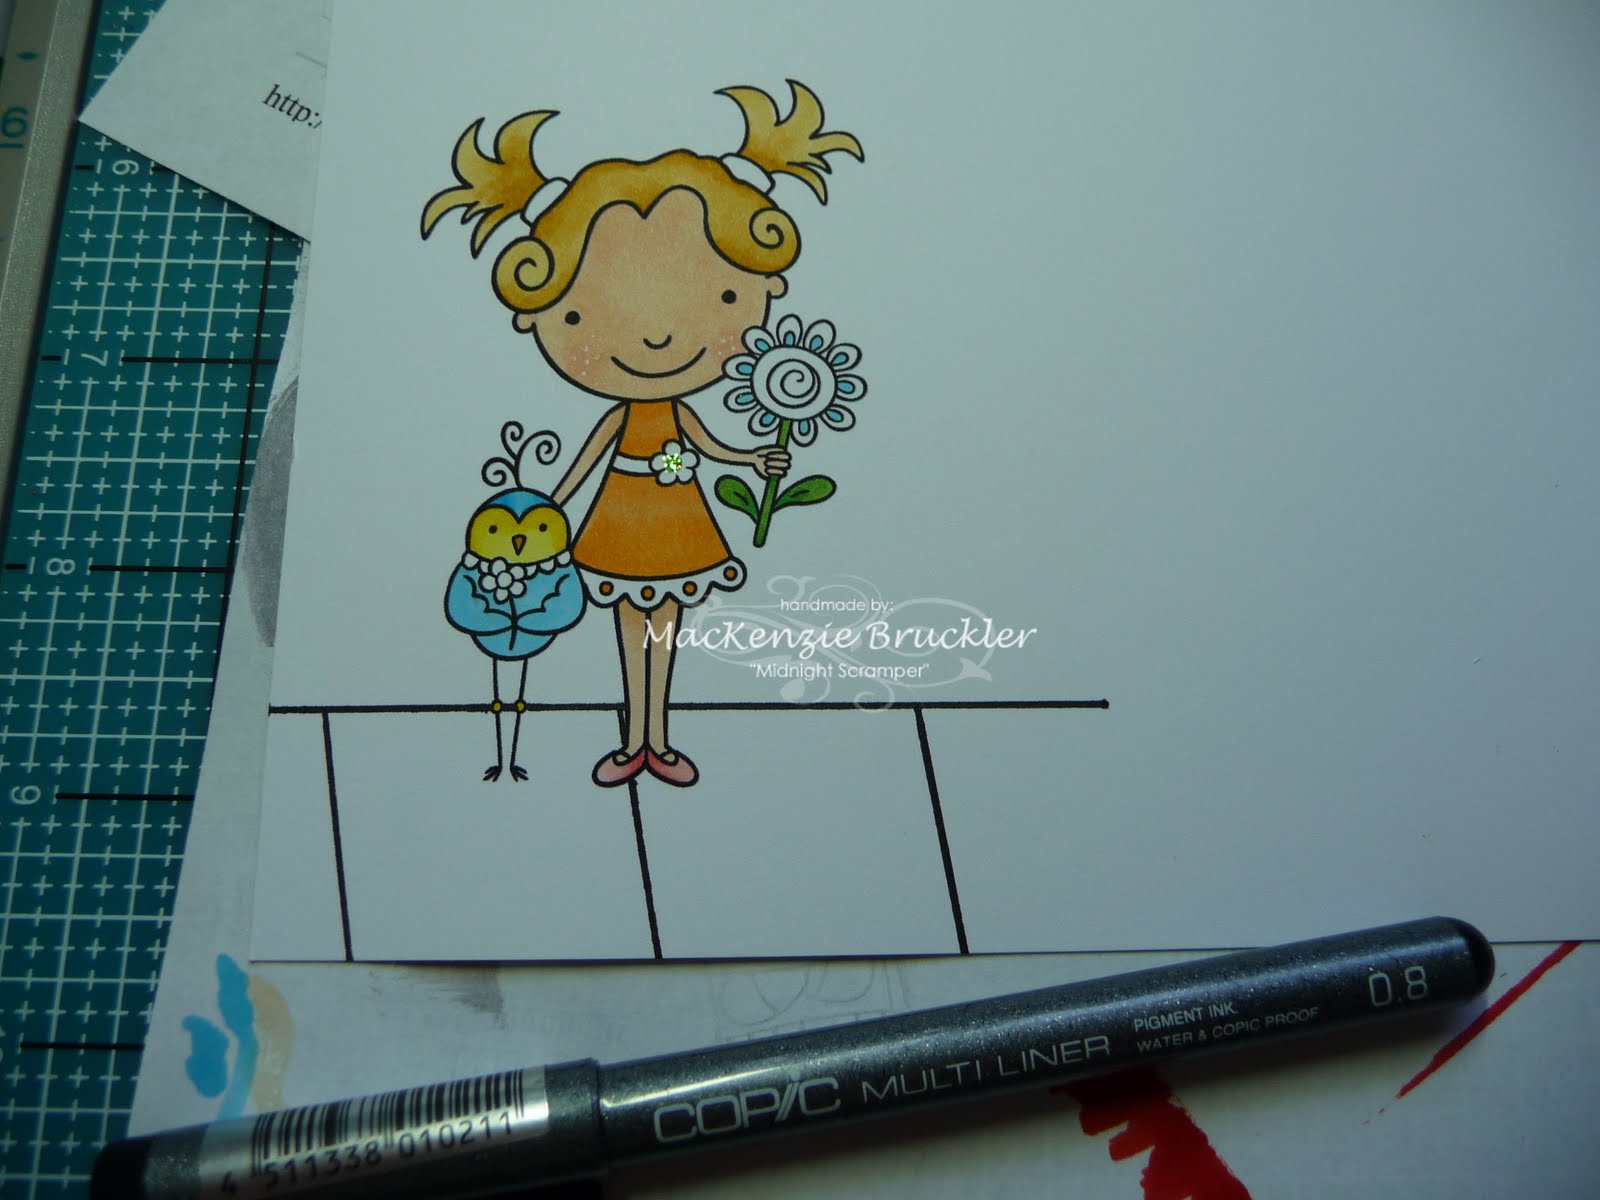
Isn't that image fun?
You can pick it up for yourself right here.

For one of the ribbon requirements, I decided to ruffle it around the edges of my sentiment.
The second one may be a little hard to spot, but I promise that it's there. See it at the end of the scarf?

I took a small piece of black ribbon and frayed the edge. Then I glued it to the end of the scarf to look like fringe.

You'll definitely want to play along with us this week, because FIVE Pink Cat Studio images are up for grabs! Be sure to leave a link to your ribbon creation on the challenge blog.
Have a fantastic weekend!

Thursday, August 19, 2010

Heeeeere's BLOBBY!

It's digital release day at Pink Cat Studio and I'm thrilled to introduce you to... These are the images being released today and Lily is a freebie with any purchase!
As soon as I saw Blobby, I knew he'd be perfect for a birthday gift set.
Adorable, no?

This gift bag is SO simple to make out of one sheet of cardstock. I'll share a tutorial for it next week if anyone is interested.
I used lots of bright colors on this one and embellished the sentiment panel with some orange jewels.

For this goodie bag topper, I flipped the image and put them side by side, so it looks like they're holding hands.

And here's the matching card.
Just look at all that glitter stuck to Blobby! He sure is SPAR-KA-LAY! I used a balloon image from the "Dress Up Lily" set to finish this one off.

I hope my projects made you smile today. I sure had fun making them. To see more creations by the rest of the design team, click here. And to order some Blobby's for yourself, click here. Thanks for stopping by my little corner of the world today.
Hugs,

Wednesday, August 18, 2010

A little something for the teachers

The kiddos started school yesterday and we're starting to get back into the ol' routine. We always like to bring a little something to the teachers on the first day. This year I decided to make notepads. I bought some white notepads from PaperTrey Ink a while back, that were perfect for this project. Each pad measures 8" x 2.5" and 1/8" thick. I decided to add a notepad to each side of the cover so the teachers could use these throughout the year.
Here's a close up of the front cover. I used paper scraps, a sentiment from Hambo and finished it all off with a button.
To make the cover:
Cut cardstock to 5.5" x 8.5".
Then score at 2.5" and 2.75".
You can get two covers from one sheet of 8.5" x 11" cardstock! Love that! Thanks so much for stopping by today.

Tuesday, August 17, 2010

Copic concrete and grass

Today I thought I'd share a simple tutorial on how I drew the sidewalk and grass on the card below. Using a Copic multi-liner pen and a straight edge, draw in a sidewalk.
Continue until your sidewalk is the size you want it.
Here's what mine looked like when I was done.
Start with a Copic C7 and go around all the edges.
(I use the chisel tip for all of these steps)
Next, blend in C5 around the edges.
Finally, fill in with C3.
Easy-Peasy!

I usually like to add a little grass also.
To do that, I make a thick line with the chisel tip of YG17.
(This will help avoid white spaces in between your blades of grass)
Choose a darker shade of green, and make small strokes with the brush tip.
Then fill in with various shades to finish off.
Here's what my finished image looks like.
I really hope this was helpful! Give it a try!
Thanks for stopping by.