Followers

Showing posts with label tutorials. Show all posts

Wednesday, November 30, 2011

Peppermint Twist

Happy Wednesday crafty people!
Today is challenge day over at the Inky Impressions Challenge Blog and this will be my last project as an Inky team member.  The challenge today is called "Peppermint Twist" and we want to see how you interpret it onto your holiday card or project. 
Got any red and white striped twine? 
Cute candy embellishments?
How about a fun candy cane image?
I decided to use some cute candy themed patterned paper and make a 4" x 4" gift card holder.
Here's a peek at the inside...
The best part about this project is that it's QUICK and EASY. 
(My two favorite words when it comes to crafting) 
You can get three of these babies out of one 12" square of cardstock!

Here's how to make one...
Cut cardstock to 4" x 12" and score at 4" and 8".
This will leave you with three 4" sections.

Next, score the middle section diagonally, starting from the top left corner and ending at the bottom right corner.

Fold on the middle score line and this is what you'll have.

Next, fold over the right section as shown and adhere.

Then fold up the bottom square behind the diagonal fold.

Ta-Da!
Now you have a pocket. 
Adhere where needed, being sure to leave room in the pocket for your gift card.  Then embellish your little heart out and make someones day!

Monday, November 7, 2011

How to make a quilted background

I recently posted this card for a Pink Cat Studio release. 
When I was figuring out how I wanted to design the card, I knew that I wanted a simple layout and a white background.  I was totally inspired by a photo of a wedding cake in a magazine that had a a quilted design rolled onto the fondant.  It was so pretty and I thought I'd try to recreate it on paper.

I can't believe that I got it totally centered on the first try!  Don't you just love happy accidents?!
Here's a quick peek at how I did it... 
First, I cut my cardstock to 4.25" x 11", scored it down the middle.  (I always have the folded score line at the top of my cards).  Then I placed the bottom left of my card front into the 2.50" notch on my Scor-Pal and placed the other corner at the 5.50" mark on the right side of the Scor-Pal.  Starting at the 2.50" notch, I scored every half inch to the right and then to the left.
Clear as mud?

Then I turned the cardstock clockwise so the bottom right of the card front was at the 9.50" notch and the other corner was at 5.50" on the left side of the Scor-Pal.  Then I scored again every half inch.

This is what you'll have!
Perfectly centered perfection - love it! 
I decided to add some teeny tiny pearls for a bit of dimension at the points where the scor marks intersected.
Hope you're inspired to give it a try!
Thanks for hoppin' by today.

Friday, June 3, 2011

Christmas Stampin' All Year Long

 It's the first Friday of Summer vacation and I'm soooo looking forward to sleeping in!  It's also challenge day over at CSAYL and our fabulous sponsor this week is none other than PINK CAT STUDIO.  There are 5 free digis up for grabs, so be sure to play along!

Our challenge this week is called "A Little Something From Me to You".
Create a gift card holder.
You can make up your own design or use a favorite tutorial.

Here's what I came up with using an image called "Lily and Tweet in Presents".

The finished project measures 5" x 5" and only took minutes to make.

Start with a 10" square of cardstock and score at 2 1/2" and 7 1/2".  Then rotate ninety degrees and score again at the same measurements.
Cut off the four corners and pre-fold on your score lines.
Without using any adhesive,
fold down the top section as shown.
Then repeat with the right side.
And the bottom.
And finally the left side.
To hold your packet closed, fold the top part of the left panel underneath the first fold that you made.
Clear as mud?
Then decorate each section with a 2" square of patterned paper.
When you open all of the folds, the inside will measure just under a 5" square.  This leaves loads of room to decorate your little heart out and insert a gift card.  Thanks for stopping by (sometimes I wonder if anyone ever does).  Be sure to hop on over to the CSAYL blog to see some awesome samples from the dt and our guest designer!

Monday, January 10, 2011

Meet Asia

Happy Monday peeps!
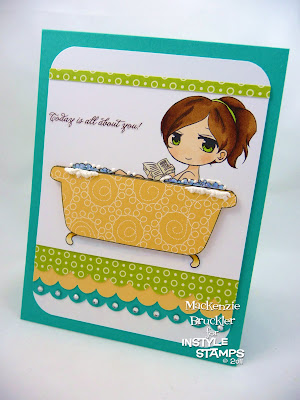
This is my first official post as an InStyle Chickie and today I'd like to introduce you to "Asia". Isn't she adorable?
You can find her right here.

Whenever I post an InStyle project, I'll be sharing step-by-step instructions with you.

Here's how I put together my card for today:
I started with a 5.5 x 4.25" base of Bermuda Bay and attached a 3.75 x 5" piece of white cardstock with rounded corners. Then I cut 1 x 3.75" strips of three colors and punched a scallop border. When I punched the borders, there is a small strip of cardstock left over. I saved the green one (see photo above).

Attach the scalloped strips to the bottom of the card, leaving some white showing.
(hang on to that extra green strip)

Next, I printed out "Asia" onto white cardstock AND yellow patterned paper. I cut the white printed image to 3.75 x 3" and I cut just the bathtub from the yellow patterned paper.

I colored the image with Copics and then attached the yellow patterned paper bathtub with dimensionals. Then I attached it to the card, just above the scallop layers. To make the top look more finished, I added that little strip of green paper that I had leftover from my punch.
Voila! Finished card!
Now comes my favorite part.....embellishing!!
I added some "waterfall" blue Stickles and liquid applique to make bubbles.

And what card of mine would be finished without jewels?!

It was all finished off with a rub-on sentiment that I thought went perfectly with the image.

Here's another peek at the finished card...
And here are the Copics used...Here's a quick tip regarding paper piecing...
Before I attach my patterned paper with dimensionals, I always take a Copic marker of a similar color and fill in the edges of my image.

That way, when you see the image from the side, it's nice and matchy-matchy.
Okay kids, that's it for me today! Thanks for popping by!

Wednesday, August 18, 2010

A little something for the teachers

The kiddos started school yesterday and we're starting to get back into the ol' routine. We always like to bring a little something to the teachers on the first day. This year I decided to make notepads. I bought some white notepads from PaperTrey Ink a while back, that were perfect for this project. Each pad measures 8" x 2.5" and 1/8" thick. I decided to add a notepad to each side of the cover so the teachers could use these throughout the year.
Here's a close up of the front cover. I used paper scraps, a sentiment from Hambo and finished it all off with a button.
To make the cover:
Cut cardstock to 5.5" x 8.5".
Then score at 2.5" and 2.75".
You can get two covers from one sheet of 8.5" x 11" cardstock! Love that! Thanks so much for stopping by today.

Tuesday, August 17, 2010

Copic concrete and grass

Today I thought I'd share a simple tutorial on how I drew the sidewalk and grass on the card below. Using a Copic multi-liner pen and a straight edge, draw in a sidewalk.
Continue until your sidewalk is the size you want it.
Here's what mine looked like when I was done.
Start with a Copic C7 and go around all the edges.
(I use the chisel tip for all of these steps)
Next, blend in C5 around the edges.
Finally, fill in with C3.
Easy-Peasy!

I usually like to add a little grass also.
To do that, I make a thick line with the chisel tip of YG17.
(This will help avoid white spaces in between your blades of grass)
Choose a darker shade of green, and make small strokes with the brush tip.
Then fill in with various shades to finish off.
Here's what my finished image looks like.
I really hope this was helpful! Give it a try!
Thanks for stopping by.