


This is another project we'll be doing at my Valentine workshop this weekend.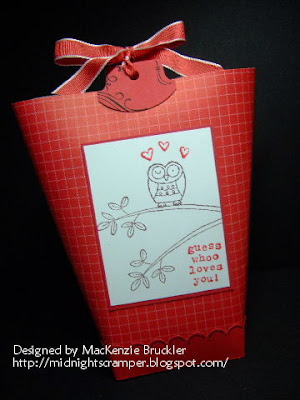 I used the Riding Hood Red designer paper pack to make this little pouch.
(I think it's "technically" called a bag-in-a-box)
I found some mini boxes of Mrs. Fields chocolates at the $1 spot in Target the other day, and they fit perfectly inside.
Want to make one of your own??
Come on....you know you do!
It won't take more than 10 minutes to put this whole project together!
Here's how:
Start with a 3 1/2" square of cardstock and score each side at 1/2"
 Next you'll want to score diagonally through the small squares at each corner. I've marked them with a pen so they're easier to see in the photo.
 Fold in on the corner score marks.
 Add adhesive to the folded corners and you now have a mini box that measures 2 1/2".
 Cut a piece of double-sided patterned paper to 5 1/2" x 10 1/4".
Add adhesive to the top and one edge of the paper.
 Now line up your box to the edge of the paper and "roll" it to the top.
 This is what you'll have...
 It kind of looks like a cup at this point.
 Then cut a strip of coordinating cardstock to 1" x 10 1/4".
I also scalloped the border and doodled with a black marker.
 Adhere border to the bottom edge of your pouch.
 Voila!
To finish it off, I stamped and punched out cardstock with my Round Tab Punch. I adhered one to each side of the pouch, punched a hole with my crop-o-dile and tied them together with some Riding Hood Red taffeta ribbon. Hope this was helpful! Thanks for stopping by.
See ya tomorrow,

 I used the Riding Hood Red designer paper pack to make this little pouch.
 (I think it's "technically" called a bag-in-a-box)
I found some mini boxes of Mrs. Fields chocolates at the $1 spot in Target the other day, and they fit perfectly inside.
Want to make one of your own??
Come on....you know you do!
It won't take more than 10 minutes to put this whole project together!
Here's how:
Start with a 3 1/2" square of cardstock and score each side at 1/2"
 Next you'll want to score diagonally through the small squares at each corner. I've marked them with a pen so they're easier to see in the photo.
 Fold in on the corner score marks.
 Add adhesive to the folded corners and you now have a mini box that measures 2 1/2".
 Cut a piece of double-sided patterned paper to 5 1/2" x 10 1/4".
 Add adhesive to the top and one edge of the paper.
 Now line up your box to the edge of the paper and "roll" it to the top.
 This is what you'll have...
 It kind of looks like a cup at this point.
 Then cut a strip of coordinating cardstock to 1" x 10 1/4".
I also scalloped the border and doodled with a black marker.
 Adhere border to the bottom edge of your pouch.
 Voila!
To finish it off, I stamped and punched out cardstock with my Round Tab Punch. I adhered one to each side of the pouch, punched a hole with my crop-o-dile and tied them together with some Riding Hood Red taffeta ribbon.
Hope this was helpful! Thanks for stopping by.See ya tomorrow,


3 comments:
very cute! Thanks for the tutorial.
great project and tutorial- it will go on my list of things I want to try out this weekend!
This is just adorable -- thanks for the tutorial
Post a Comment