


Eight days left! Is anyone else freaking out?
I still need to bust out about 40 more Christmas cards by this weekend.
Here's one I came up with last night using this sketch from Splitcoast. The appletini images are from this set by My Favorite Things and the pink patterned paper is from Anna Griffin. So far I've gotten four projects out of one 12 x 12 sheet! You can see the other projects here, here and here.
The skinny strip of red patterned paper is from the SU "Ski Slope" collection in the current mini catalog which matches perfectly with the Riding Hood Red card base.
And here's the best part, inside...
 Oh how true that sentiment is. What I wouldn't do for an elf right now!
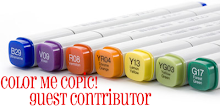
Here are the Copics that I used to color in the glasses.

I also thought I share a quickie tutorial with you today, to show how I got the circle openings on the main panel spaced out so evenly. I'm sure there are other ways, but here's how I do it.
After I figure out what size and shape I want my openings to be, I punch the shape out of SCRAP PAPER.
 Then I figure out where I want them and adhere with a little adhesive.
 Then I just punch right over them.
 Voila! Perfectly spaced openings!

I still need to bust out about 40 more Christmas cards by this weekend.
Here's one I came up with last night using this sketch from Splitcoast.
 The appletini images are from this set by My Favorite Things and the pink patterned paper is from Anna Griffin. So far I've gotten four projects out of one 12 x 12 sheet! You can see the other projects here, here and here.
The skinny strip of red patterned paper is from the SU "Ski Slope" collection in the current mini catalog which matches perfectly with the Riding Hood Red card base.
And here's the best part, inside...
 Oh how true that sentiment is. What I wouldn't do for an elf right now!
Here are the Copics that I used to color in the glasses.

I also thought I share a quickie tutorial with you today, to show how I got the circle openings on the main panel spaced out so evenly. I'm sure there are other ways, but here's how I do it.
After I figure out what size and shape I want my openings to be, I punch the shape out of SCRAP PAPER.
 Then I figure out where I want them and adhere with a little adhesive.
 Then I just punch right over them.
 Voila! Perfectly spaced openings!
 Hope that was helpful. Have a super Thursday. Now that Survivor is over, I guess I have the perfect opportunity to bust out 39 more cards this evening.
Be sure to stop by the Hambo Retiring Page to order your goodies before they're gone forever! Monica is giving FREE SHIPPING to everyone who orders 5 or more items from the retiring page! Can't beat that!
See ya tomorrow.
Hugs,
See ya tomorrow.
Hugs,


1 comment:
How cute! And what a clever way to make sure the spacing is even! I love it!
Post a Comment