Followers

Friday, May 30, 2008

Class Project #2

Michelle Zindorf has inspired me to start using my brayer that has been collecting dust for a while now. She has a great blog with the most amazing tutorials that you'll ever see. Go check it out when you have a chance.

This is a card that I came up with for my June class that I'll be teaching next weekend. I figured that we had to do at least ONE Father's Day project right? We'll be using a set called "On The Fly" by Stampin Up. I designed the background with the fisherman all by myself with my brayer! Here's how I did it.


This is the first step - THE MOST IMPORTANT STEP! Your image will get ruined if you don't do it in this order.
Step 1
First, I stamped my image on Whisper White and colored it in with my SU markers. Then I colored over the entire image with my clear Sakura Glaze pen.

Step 2

Okay, now we're ready to brayer! I took a picture of each step, but you'll be doing all of the steps on one piece of paper.

First, I brayered Bashful Blue (for the water) on the bottom half of the cardstock and then Not Quite Navy (for the sky) on the top half. I left a white space in the middle, about an inch, because I wanted to put mountains there.

Next, I took a post-it note and tore two edges of it. I put one on top of the white and one of the bottom of the white. Then I brayered Sahara Sand in the middle.

For the last part, I left the post-it notes in place and sponged Chocolate Chip along the top and Wild Wasabi along the bottom and up onto the trees. Voila!

I hope this inspires you to whip out that brayer that's hiding in your drawer!

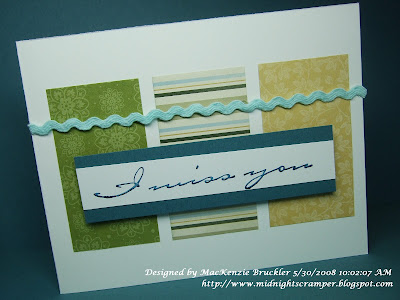
Color Inspiration Challenge #10

The fabulous Kristina has posted another color challenge for us to play with.

This week the colors were: Old Olive, Bashful Blue, Whisper White, So Saffron and Not Quite Navy.

I decided to go out of my comfort zone on this one and use Whisper White for the base of my card.

The patterned papers are from SU's "Bali Breeze" line
and "Le Jardin".

Check back later today for the next card I created for my class and a cool tutorial for ya. Now go do some stamping!


Thursday, May 29, 2008

Okay...just one more!

I have one more "Billy" card to share with you today. This one was really quick to make. Our neighbors just gave my son an awesome bike, and we all know that I can't sleep until a thank you card has been written and delivered!

I was able to use up lots of paper from my scrap drawer for this one. *happy dance*

I colored "Billy" in with my Copics and filled in the frog with my clear Sakura Glaze Pen.

If you haven't done so yet, go check out the great stamps at Pink Cat Studio and tell them that MacKenzie sent ya!

I'll be back tomorrow to share an awesome card that I created for my class next weekend.

Tuesday, May 27, 2008

Feeling Froggish

It's official...I'm in love with "Billy".
You've got to check out Pink Cat Studio's website when you have a chance. (I've added a link on my sidebar)
My son's class has a frog mascot and I thought it would be cute to make a frog card for him to give his teacher at the end of the school year. Did I go a little overboard with the frogs? Perhaps. They just looked so darn cute all stacked up on his head!

The card base is SU Not Quite Navy and the patterned paper is from a retired SU Simply Scrappin' set called "Creative License" (It's very similar to the Jersey Shore line)

The large eyelet at the bottom came from the Crop-A-Dile kit that I bought at Costco a couple of months back.

Here are the specific Copics that I used to color in my images.


Monday, May 26, 2008

Sorry honey, but I'm in love with Billy...

I just got my new "Billy" and "Lily" stamp sets in the mail from Pink Cat Studio! I'm a happy little stamper!
First of all, I'd like to tell you what a great company Pink Cat Studio is. They are located in Canada and I'm in California and it only took 5 days from when I placed my order online until my adorable stamps were in my mailbox! *happy dance* Plus, they kept me updated via e-mail on the status of my order / shipping / etc.
Oh, and for an additional $1, they will customize the packaging to YOUR child's name in the place of Billy & Lily. My kids were squealing when I let them see Mommy's new stamps with their names on it.
The first image that I inked up was the little super hero. Does anyone with a son, not own a pair of Superman pajamas with a cape attached to the back?! I think that every little boy has owned a pair of these at some point. For my first official "Super-Billy" card, I decided to shape the card like a cape. I didn't think a standard rectangle card would do this cute little image justice.
I used my Creative Memories wave cutter to create the card shape. Next, I used my Scor-Pal to create a fold line 1/2" from the top of the card. Then I used my Crop-A-Dile to add a couple of eyelets so I could tie my twine at the top.
I colored in the image with my Copic markers and went over the mask and outfit with my Sakura glaze pens - love those things! Here's a close up of the glaze pen effect.
I used my Giga and Mega Marvy punches for the scalloped circles and a 1" circle punch for the sentiment on the sides of the cape. The large red circle and the munchkin are popped up on dimensionals. To finish it off, I did some paper piercing around the edges.
These are the specific Copics that I used to color the main image.

SU Cardstock used: Not Quite Navy, Real Red, Summer Sun, Whisper White

Friday, May 23, 2008

Punny gift card set

It's time for me to start prepping for my June class! Here is one of the projects that I've come up with for the gals this time. Right now I'm just lovin the "Bali Breeze" patterned paper and Pun Fun, so why not incorporate them both into one project?
I wanted everyone to be able to use EVERY stamp in the set, so we'll be making a set of 8 gift cards. They each measure 3 x 3 and I'll be supplying mini envelopes to go with them. I also thought it would be fun for the gals to try out some of the various coloring tools that SU offers.

For the skunk and the lamb images, we'll be using the chalks

For the hippo and the kitty, we'll be using the watercolor pencils with blender pens.
For the latte and the whale, we'll be using SU markers.
And for the bird and the rocket, we'll be using the Earth Element watercolor crayons with the aqua-painters.
(It's going to be VERY hard for me to share my watercolor crayons with 20+ other stampers... )

The cardstock colors we'll be using are Pumpkin Pie, Purely Pomegranate, Certainly Celery and Taken with Teal. They match perfectly with the "Bali Breeze" line. I'm also going to try to create a box that will hold all 8 cards and 8 envelopes. I will definitely share the template if I can get it to work out for me.

Thanks for popping by today - have a super weekend!

Thursday, May 22, 2008

Wanted to share...

some cards that were made by other people. The first one was submitted for my last sketch challenge by Trish over at Hand full of Stamps. I love the color combo that she used.
The second card was made by my super talented friend, Wanda. She's in my swap group that meets once a month and always has a fun card to share with everyone.

The bird "swings" open to show the greeting. Too cute!


Wednesday, May 21, 2008

Put off...

Have you ever had a project that you were dreading? You kept putting it off because you didn't have the exact supplies that you wanted? This was THAT project for me.
My son's Taekwondo teacher had a birthday yesterday and I've been putting off making his card because I have no Taekwondo stamps or paper of any kind. I waited until the last possible minute for inspiration to hit.
While perusing the Internet into the wee hours of the morning, I decided to look at some Clip Art. I found two images that I thought would work if I could size them up correctly to each other. I printed them up on SU Whisper White, but they came out gray instead of black. I grabbed my black Sakura glaze pen and traced the image. I love how it came out!

The glaze pen gives your image an embossed look and feel without using a heat tool. These are my new favorite supply to play with right now!

The card base is Purely Pomegranate and the blue pattern paper is from the "Jersey Shore" line from SU. The instructor is a 4th degree black belt, so I used my yellow hemp twine to wrap around each end of the cardstock four times. I finished off the card with the round punch tab on the lower left of the main image.

Monday, May 19, 2008

Purrrrfect...

Hope you all had a lovely weekend.
I got the most adorable book in the mail from my Aunt. It had tons of cute photos of cats with beautiful quotes. After I was able to wrestle it away from my daughter and get a good look at it, I was inspired to make a kitty card to thank her.
The only cat image that I have right now is the little cutie from "Pun Fun". I used my Copics to color her in (yes, she's a "her") and then went over her stripes with my black Sakura glaze pen. I Versamarked a paw print onto Certainly Celery cardstock and punched them out with my 1" circle punch.
The patterned paper is from Basic Grey's "Stella Ruby" collection.
Here's how I made the collar...

I Versamarked a large solid background stamp and embossed it with silver powder.

Next, I stamped the sentiment from "Pun Fun" in black Staz On onto the embossed surface.

Then I punched it out with my 1" circle punch and added an eyelet to the top with my Crop-A-Dile.

For the last part, I used a scrap of Creamy Caramel and attached a row of eyelets. I used natural hemp twine to tie the tag to the collar and adhered it to the card front with dimensionals.


Thanks for stopping by!

Friday, May 16, 2008

Best Fishes

I got a request to make some blank cards with an ocean theme. I ended up playing with the little fish image from an old Sale-A-Bration set called "Very Punny". I have to admit that I *had* to have this cute little set, but have found it very difficult to use. I was pretty happy with how this card came out since I usually have a difficult time with small images.
First I stamped three of the fish in a row and colored them with my Copics. It was a little boring and lacking, so I stamped a few more fish onto scraps, cut them out and popped them up on dimensionals. Much better....

I used my 1 3/8 circle to make the waves with the teal paper, layered it and then added blue Stickles to the edges.
The yummy teal ribbon was wrapped around the entire front of the card. I used a craft knife to cut a slit in the fold of the card and pulled the ribbon through.
This is what the ribbon looks like from the inside.

Don't forget to check out my sketch for this week. You have until next Wednesday to send me a link to your card so I can share it with everyone!

Wednesday, May 14, 2008

"It's A Good Thing"

The uber-fabulous Kristina has posted another great color challenge! This one came from the Martha Stewart website. We had to use Real Red, Pumpkin Pie, So Saffron, Old Olive and Tempting Turquoise. I had to make a birthday card for a friends son who is turning five this weekend and these colors were perfect!
Okay...PERHAPS I got a little carried away with this card, but I was having so much fun with it that I didn't want to stop. This card also helped me to step out of my 4 1/4 x 5 1/2 comfort zone. Other than a couple of 5 x 7's, I've never made any other size card. *gasp!* This card measures 4 x 8 1/2 and gave me lots of room to play with.
After I got the train colored in with my copics I decided to cut out each image. I used a piece of Old Olive cardstock and ran it through my Sizzix machine with an embossing folder from Cuttlebug to make a grassy hill. The train looked like it was floating, so off to my scrap drawer I went to get some Chocolate Chip cardstock to make a track.
I grabbed the mini background, raccoon and balloon images from "Hip Hip Hooray" and added them. I did some paper piecing on the little guys shirt and added a #5 cork sticker from my collection.
Kind of hard to tell from the pics, but I used my Sakura glaze pens on the balloons, tiger and miscellaneous parts of the train to give it a little shine.

Here's a close up of the Sakura gel pen effect on the tiger


These are the specific Copics I used to color the train images.

Midnight Scramper Sketch Challenge #4

Here's my sketch for week four. If you read this, consider yourself invited to play along. I used my card from the previous post as the inspiration for this sketch.
Leave a comment on this post with a link to your creation by NEXT Wednesday and I'll share it with all of my blog readers.
If you upload to Splitcoast, please title your card MS004 so I can find it. Happy Stamping!

It's that time of the month again....


SWAP TIME!! I just love meeting with the gals in my stamp club. They are all so fun and unique. About 10-12 of us swap cards each month and this was my contribution for our May swap. I was totally inspired by a gift box that I saw in the new SU catalog.
This big beautiful flower image is from the level 3 hostess set called "Time Well Spent". I'm SO glad that I got all 11 of the flowers watercolored and cut out the night before I broke my finger!!
I used my Earth Elements watercolor crayons to paint the main image and then popped it up on dimensionals. The blue pattern paper called "Le Jardin" was left over from a class I taught a couple of months ago and went nicely with the bright pink flower.
The green ribbon is some crazy stuff I bought a loooong time ago, but have really had a hard time using it. It's very wide and doesn't make a pretty bow, so it's been sitting patiently in my ribbon storage rack waiting for it's moment to shine. It worked perfectly for the leaves don't you think?! And I had exactly enough to make my 11 cards for the swap! *happy dance*
On the bottom corner of each card, I used a different green rub on from the Sale-A-Bration catalog in February.
Thanks for stopping by,