Followers

Monday, June 16, 2008

Swap Time!

I know I promised to share all of the cards from my swap group last week, but time got away from me and I didn't have a chance to take photos until this morning. Sometimes there just aren't enough hours in the day!
I decided to use the pirate image from my Billy set by Pink Cat Studio for my swap card this month. If you have a chance, you have to check out the new Billy set that was just released. It's called "Dress Up Billy" and it is adorable! Okay....back to our regularly scheduled programming....
For this card, I stamped out pirate Billy and his dog with black Staz-On and then colored them in with Copics. Then I cut them out and adhered them to the front of the card with dimensionals.
For the top part of the card, I tried to repeat the eyelet and laces pattern that was on Billy's vest. I used my SU natural hemp twine for the laces. I used my SU markers to color the images in the circles before I stamped them out. (To see a tutorial on how I cut out the circles and centered everything perfectly, check out this post.)
I knew that I wanted to have some kind of gold on the card, but didn't seem to have a stamp or embellishment that would work.
I'm a visual person, so I don't have my stamps stored in their cases. EVERY SINGLE one of my stamps is displayed on glass shelving on all of the walls in my workshop. (you can see a bit of it here)
When I couldn't figure out what to use for the gold accent on this card, I sat in my "spinny" chair and scanned all of the walls of my room, trying to think out of the box a little.
Can you guess how I made the gold nuggets / coins??

These are the coal buttons for the snowman in SU's "Cold Play" set. I Versamarked them all over the bottom of the card and embossed in gold. Mission accomplished!

Here are the cards that the other gals in swap group made this month:

Janice's card and envelope Katrina's card

Wanda's cardDarlene's card
Janelle's card
Donna's card
Marty's card

For those of you who haven't heard, the Stampin Up retired list was released at midnight yesterday! Click here for the list!

Sunday, June 15, 2008

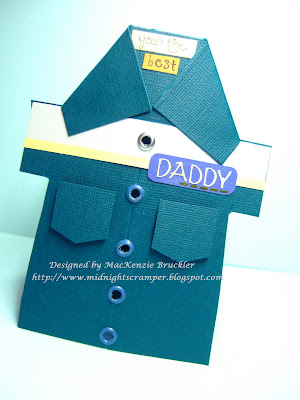
HAPPY FATHER'S DAY

I feel so lucky to have a husband who has made it possible for me to stay home and raise our children. It was a really big change to go from two full time incomes down to one after our first was born, but the sacrifice was SO worth it. Even though I feel like I'm going crazy at times, I am thankful every day to have the opportunity to be the kind of Mom that I always wanted to be.

In addition to all of the spoiling that will be going on in our home today, the kids asked me to make Daddy a special card with SU's "All in the Family" set. This card gave me the perfect opportunity to break in the Stamp-A-Ma-Jig that I got in the mail yesterday!

The card base is Not Quite Navy with More Mustard as an accent color. Everything else used was from the scrap bin - gotta love that! I did paper piecing on the outfits and used my Copics to color the faces, hair, shoes and kitties. The kids were really happy with the way the card turned out and I think my husband will get a kick out of it.


This is the card that I made for him - from me. Since he's such an AMAZING provider and works so hard everyday, I thought it would be cute to use his work shirt as my inspiration.


Thursday, June 12, 2008

Some cat butt love...

Kristina just posted her color challenge for the week! *happy dance*
Here's my entry for week 11
Don't you just love making cards when there's a theme involved? It makes it SO much easier to get the creative mojo flowing. Obviously this card is for a cat lover! The image is by Stampola and is appropriately called "Cat Butt Love". The patterned paper is from the "Stella Ruby" collection by Basicgrey.
I decided to have another go at a gate fold card and this large heart on the right side of the card interlocks with the smaller heart on the bottom left. That way the card stays shut - major pet peeve.
I used liquid applique on the "ankles" of the girl kitty to make them furry.
Here's what the inside looks like.
Thanks for popping by!

A little get well humor

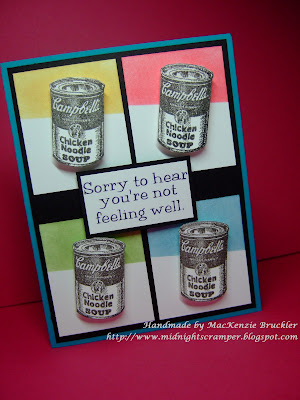
for my thoughtful friend who couldn't make it to my class on Sunday because she was sick. She called the night before to let me know that she was sick and didn't want to come and chance my kiddos getting sick. I thought that was SO considerate of her - not to mention that she probably didn't feel much like stamping anyways.

Don't you just hate it when someone comes over to your house when they know they're sick! Next thing you know, you have sick kids who have to miss school and a sick husband who has to miss work. And as all you mothers out there know, WE can't get sick because WE have to take care of everyone! Okay....I'm done ranting....Thanks Linda for not bringing cooties to my house! I love you for that!

On to the card - The chicken noodle soup can is from a company called "Stamp Happy". I discovered them at the rubber stamp expo a few years ago and they have all kinds of pop culture and unique item stamps. Unfortunately they are a very small company and don't have a website, so I have to stock up when I see them at the expo.

I stamped out the soup cans in black craft ink and then embossed with clear powder to give them a little dimension. I cut them out and popped them up on dimensionals.
For the background I sponged Taken with Teal, So Saffron, Certainly Celery and Rose Red. I was inspired to make this card after I saw a bag in the $1 store that looked just like it.

The sentiment is my favorite part of this card! Would you expect anything less from that sassy Monica at Hambo?! I've had this stamp for awhile now and have been waiting for someone to get sick so I could use it! Isn't that terrible?!


Tuesday, June 10, 2008

You hoo....

I bought this adorable little owl set months ago for only $5, plus it came with some mini bling flowers. The clear acrylic stamps are still VERY new to me, but I'm starting to get more comfortable using them.


For this card, I masked the moon and created the background with my brayer. Then I sponged So Saffron in the middle. The cardstock colors are Elegant Eggplant, More Mustard and a hint of Purely Pomegranate. I originally had just colored my owl with Copics and my yellow Sakura glaze pen, but then decided to paper piece his belly feathers.


I'd love to hear any storage tips that you have for your acrylic stamps! I'm thinking of using clear DVD cases without the middle insert, but haven't had any luck finding any yet.

Monday, June 9, 2008

Class Project #3

Do you remember the set of gift cards that I shared with you in this post? I really wanted to have a box to hold them and their envelopes, but couldn't find any templates that were the right size. I ended up creating my own box and after several attempts going right into the trash can, here is what I came up with.
I used the wheel from the "Spring Solitude" Hostess Bundle with Chocolate Chip ink on Kraft cardstock. The cute sentiment is from a set called "It's All Good" which I punched out with my 1" circle punch. The accent colors are Pumpkin Pie, Certainly Celery and Taken with Teal.
Here are the specifics on the box:
  1. For the bottom of the box, you will need to cut a piece of Kraft cardstock to 3 1/2" x 10 1/2".
  2. Score along the 10 1/2" side at 1 inch
  3. Score along the 3 1/2" side at: 1", 4 1/4", 5 3/4" and 9"

  1. For the top of the box, you will need to cut a piece of Kraft cardstock to 2 3/4" x 10 3/4"
  2. Score along the 10 3/4" side at 1 inch
  3. Next, I lined up the right edge of my cardstock to the LAST notch mark on my Scor-Pal and then scored at: 10 1/2", 7", 5 1/2" and 2".
    (see photo below)

For the band around the box, you'll need to cut a piece of Taken with Teal to 1 1/4" x 10 3/4" and follow step #3 above.

Next, I took the horizontal slit punch and used it to create a large scallop border - this technique works the best for me because I can't cut a straight line with those decorative scissors to save my life! I like to start in the middle so I have a nice even pattern.

All you have to do is slightly overlap the punches.

Then you just pull away the extra paper
After my scalloped border was punched, I attached it to the box lid and assembled. I wrapped the wide celery grosgrain ribbon around the top edge of the teal and accessorized with my 1 3/8" circle and 2" scallop punch.

Hope this was helpful! I'll be sharing the cards from my stamp club later this week.

Friday, June 6, 2008

Tickled pink and a tutorial

My daughter asked me to make her a thank you card with the pig from SU's "Very Punny". For the card base I used Elegant Eggplant and everything else is from the scrap bin. *yeah* The pink ribbed ribbon is from a mini catalog a while back (hee hee, I said ribbed)

Here's how I got all of the punched out circles in the middle to line up perfectly. First I took my 1" circle punch and punched out three circles of scrap cardstock.
Next, I used re-positionable adhesive to attach them to my cardstock panel.
Then all I did was line up my punch with the adhered circles - voila!
Now, to get my stamped image centered onto the cardstock underneath the circles, I gently trace around each circle with my embossing stylus. It will leave a faint impression of the circle so you know exactly where to stamp.

Wednesday, June 4, 2008

Graduation Card

Wanted to share this card I made yesterday for a boy who's graduating 8th grade today.

Challenge #1 - I've never made a graduation card

Challenge #2 - keep the embellishments to a minimum so it doesn't get too feminine

I used Bashful Blue for the card base and figured that would get me going in the masculine direction. Luckily I had some scraps of blue alphabet paper from the "School Days" collection by Carolee's Creations which I used for the background.

Next I took the "My ABC's" wheel by SU with bashful blue ink and wheeled it a few times onto Whisper White cardstock. I used the spiral punch on the left edge - love that punch!
The sentiment is from a set in the current mini catalog called "Full of Life", which I mounted onto More Mustard and Purely Pomegrante cardstock.
I made the pencil from scraps of paper and sponged it with Creamy Caramel.


I decided to decorate the inside of the card as well because I got him a gift card to Barnes & Noble.

Monday, June 2, 2008

My first gate fold card!

I've been wanting to try a gate fold card ever since I got my Scor-Pal, but haven't had a good opportunity to do so yet - until now.
Since I've already inked up all of my other Billy images from Pink Cat Studio, it was time to try out my little "Billy The Kid. He was feeling a little left out of the fun. Yes.....I do talk to my stamps.....
I thought this image would be perfect to do a little paper piecing on....okay, I actually ended up doing a TON of paper piecing on this. But doesn't he look so cute in his little denim jeans with matching hat at scarf?!
I used SU's "Wanted" designer paper series for everything on this card except the jeans - those were just from a scrap that I had in my bin. I used my Tombo Multi glue to attach a piece of hemp twine to the stamped image of the rope. After it dried, I used a craft knife to cut around it. His hat and horse are popped up on dimensionals, and what little cowboy would be complete without a gold Stickled belt buckle?
I cut out two large stars from Kraft cardstock with my Cricut machine, did some decorative poking and layered them together with dimensionals behind Billy. After that, I thought I was done, but when I stood up the card, it wouldn't stay closed and it REALLY bugged me.
To solve this problem, I decided to add a smaller star from my Cricut on the designer paper with a sentiment on top. The stars are from the sentiment that go with the Superhero Billy, but I thought they went nicely with the whole cowboy / Sheriff theme. I used my More Mustard Marker for the stars and Really Rust ink for the phrase. I sponged around the edges with Creamy Caramel and attached the whole thing to the left side of the card.
Now both sets of stars interlock and hold the card closed! Sorry...I get REALLY excited when an idea in my head actually turns out right on paper.

Here are the Copics that I used to color Billy's hair, skin and details on the horse.


Sunday, June 1, 2008

Eeeeek!


So....it's 1am here in California and I've spent most of the day up in my workshop being very productive. I got 5 scrapbook pages done, prepped 150 packets for my next class and created a card for my swap group that meets this Wednesday. It took me FOREVER to come up with a card design for the swap, but I finally got a second burst of "mojo" and came up with something that I really like. Now I just need to reproduce it 12 times tomorrow...
Just thought I'd share what my workshop looks like (at least one side of it) after a productive day.